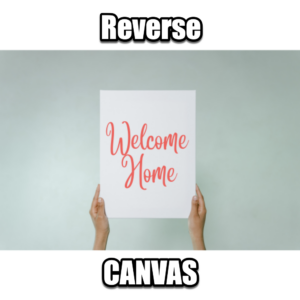
Reverse canvas is an easy Cricut project that turns a simple canvas into stunning framed art—and it’s way simpler than it looks.
Here’s the gist: pop off the fabric, reveal the wooden frame underneath, and add your custom Cricut design. Boom—you’ve got boutique-worthy decor, heartfelt gifts, or even something to sell for your small business.
No stress here—it’s beginner-friendly, affordable, and quick to make. Ready to give it a try? Let’s go step by step and turn that blank canvas into something amazing! First, here are some benefits of reverse canvas:
- Cost Efficiency: Reverse canvas enables you to work with a low-cost canvas and achieve a framed look using the canvas’s own materials. It’s budget-friendly but doesn’t skimp on style.
- Personalization Potential: From family monograms to inspiring quotes, each piece can be tailored to express something uniquely personal.
- Home Decor Versatility: Whether you lean towards farmhouse, minimalist, or eclectic styles, this technique delivers a custom look that adapts effortlessly to any room.
- Eco-Friendly Reuse: By using the entire canvas, frame included, reverse canvas encourages upcycling and sustainable crafting—a definite plus for eco-conscious creators.
Step-by-Step Guide to Crafting a Reverse Canvas with Cricut
Ready to dive into making your very own reverse canvas masterpiece? Whether you’re a Cricut novice or a seasoned crafter, you’ll find that the reverse canvas technique is accessible, quick, and yields impressive results. Let’s get started!
Materials You’ll Need:
To begin, gather these materials to ensure a smooth crafting experience. Here’s a quick checklist:
- Blank Canvas (any size you prefer)
- Cricut Machine (any model that works with vinyl or heat transfer)
- Vinyl or Heat Transfer Vinyl (HTV) for your design
- Weeding Tool to remove excess vinyl
- Heat Press or Iron (if using HTV)
- Staple Remover or Small Flathead Screwdriver to detach the canvas
Step-by-Step Process
- Prepare Your Design in Cricut Design Space Open Cricut Design Space and create or upload the design you want to display on your reverse canvas. Adjust the dimensions to fit the canvas size you’ve chosen, and remember that bold, high-contrast designs work best for visibility and impact.
- Cut and Weed Your Design Once your design is ready, load your vinyl or HTV into the Cricut machine. Cut the design, and then carefully weed away the excess material, leaving only the part you want to transfer onto the canvas.
- Remove the Canvas from the Frame Here’s where the “reverse” part comes in! Take your time to avoid tearing the canvas, as you’ll be reattaching it later.
- Transfer the Design Place your design on the canvas. If using standard vinyl, ensure you apply it smoothly, pressing firmly for full adhesion.
- Reattach the Canvas to the Frame This step reveals the rustic wooden frame as a beautiful border around your design.
- Optional Finishing Touches Add a layer of paint or stain to the wooden frame for an extra personalized touch. This step can give your canvas a more polished look and help it match your room decor.
Tips for a Flawless Finish:
- Choose the Right Canvas Size: Larger canvases make bold statements, while smaller ones are ideal for adding subtle accents to a space.
- Use High-Quality Vinyl: This ensures the design lasts longer and adheres firmly to the canvas.
- Take Your Time with the Staple Removal: Rushing this step can tear the canvas. Go slow and steady to keep everything intact.
Perfecting Your Reverse Canvas Project on Cricut
Creating a reverse canvas with your Cricut is straightforward, but if you want your project to look especially polished and professional, these expert tips can help you take it to the next level. Below, we’ll walk through essential pointers and techniques to ensure your reverse canvas comes out flawlessly every time. Think of this as your guide to avoiding common pitfalls and achieving a stunning finish.
Choose the Right Canvas for Your Design: Not all canvases are created equal! Opt for a canvas with a sturdy wooden frame to ensure it holds up well once detached. Thicker canvases with reinforced frames add durability and allow for easy reattachment, especially for larger designs.
- Tip: Check the frame quality by pressing lightly on the back of the canvas. If it feels hollow or too light, it may not be sturdy enough for your project.
Plan Your Design’s Placement Carefully: Before cutting your vinyl, consider how your design will look once the canvas is reversed and framed. Keep in mind that the frame itself will cover about half an inch of the canvas edges, so avoid placing critical parts of your design too close to the edges.
- Tip: Use a light pencil mark to outline the frame on the canvas before applying the design. This gives you a clear view of where your design will sit within the framed space.
Use High-Quality Vinyl or HTV for Crisp Results: The quality of your vinyl or HTV makes a huge difference. Premium vinyl adheres smoothly and is less likely to peel over time, especially when applied to fabric. For reverse canvas, heat transfer vinyl (HTV) often yields the best results, as it bonds well with the canvas fibers.
- Tip: Set your Cricut machine to the correct material setting based on your vinyl type, and consider doing a test cut to ensure accuracy.
Weed Carefully and Efficiently: After cutting your design, take time to carefully weed out excess vinyl. Since canvas has a textured surface, any remaining bits of vinyl can make the finished design look messy.
- Pro Tip: Use a bright light or a weeding tool with a magnifier for intricate designs. This helps you see and remove even the smallest pieces of vinyl that may affect the look of your project.
Apply Vinyl with Firm, Even Pressure: When using HTV, apply steady, even pressure with a heat press or iron to ensure your design fully adheres to the canvas.
- Tip: If you’re using an iron, press firmly and hold it down for 15-20 seconds on each section, without sliding. This helps prevent wrinkles and ensures strong adherence.
Give the Vinyl Time to Set Before Reattaching the Canvas: Once you’ve applied your design, let it cool for a few minutes to ensure the vinyl has fully bonded with the canvas. This step reduces the risk of peeling or lifting when you handle the canvas.
- Tip: While the vinyl cools, inspect your wooden frame and make any desired adjustments, like sanding rough edges.
Reattach the Canvas Carefully: After the vinyl is fully set, use a staple gun to reattach the canvas to the wooden frame. Start with the center of each side and work outward to maintain tension across the canvas, ensuring it stays smooth and taut.
- Pro Tip: For a professional look, stretch the canvas slightly as you staple it to keep it firm within the frame. Be careful not to overstretch, as this can distort your design.
Consider Adding Finishing Touches: For extra charm, you can stain or paint the wooden frame to match your home decor. Distressed finishes are also popular and can add a rustic vibe to the overall piece.
- Tip: If you’re painting, choose a color that complements your design.
Bringing Your Reverse Canvas to Life
Remember, the magic of reverse canvas is in its simplicity and creativity. It’s a project where every piece reflects you. Play around with sizes, colors, or finishes—there’s no wrong way to make it your own. And don’t forget to enjoy the process! Crafting is about having fun and expressing yourself, so be proud of what you create. Who knows? Your next project might inspire someone else to get crafting too. Happy creating!