Uploading images to Cricut Design Space might seem hard at first, but once you break it down, the process becomes much more manageable. Here’s a step-by-step guide that will help you navigate the uploading process with ease.
Step-by-Step Process
- Prepare Your Image: Before jumping into Design Space, make sure all your images are ready. Whether you’re using PNG, JPEG, or SVG files, ensure that each one is properly sized and formatted for Cricut. This will save you time later on.
- Open Cricut Design Space: You’ll need to be logged into your Cricut account before starting the upload process.
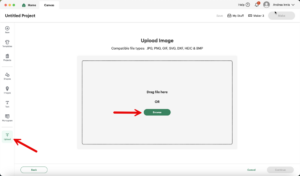
- Navigate to the Upload Tab: On the main dashboard, locate and click the “Upload” button in the left toolbar. This will take you to the image upload area.
- Select “Browse” Option: Select it, and you’ll be able to choose all the images you want to upload in one go.
- Choose Your Files: Browse your device or cloud storage and select the images you want to upload. Hold down the Ctrl (Windows) or Command (Mac) key to select multiple images at once.
- Finalize the Upload: After selecting your images, click “Upload” to send them into Cricut Design Space. You may need to confirm each image’s file type and ensure it matches the specifications Cricut accepts.
Table: Quick Reference for Uploading Multiple Images
| Step | Action | Details |
| Prepare Your Images | Organize all files you want to upload. | Ensure images are formatted correctly (PNG, JPEG, SVG). |
| Open Cricut Design Space | Launch Cricut Design Space and log in. | Make sure you have a stable internet connection. |
| Access the Upload Section | Click on “Upload” in the left toolbar. | Navigate to where you can upload your images. |
| Select “Browse” | Look for and select the multi-upload option. | This option lets you bulk upload files. |
| Choose Your Files | Select all desired images using Ctrl/Command. | Ensure the images are in acceptable formats. |
| Finalize Upload | Click “Upload” and confirm the images. | Wait for the upload to complete. |
Troubleshooting Common Issues
Even though uploading images to Cricut Design Space is a straightforward process, sometimes hiccups can occur. Whether it’s a technical glitch or a simple mistake, these issues can slow you down and frustrate your workflow. But don’t worry—knowing how to troubleshoot common problems will keep your crafting process smooth and stress-free. Here’s a guide to help you tackle some of the most frequent challenges.
Issue 1. Image File Type Issues: One of the most common problems crafters face when uploading multiple images is file compatibility. Cricut Design Space only supports certain image file types, such as PNG, JPEG, SVG, and GIF. If your files are in a different format, they won’t upload properly.
Solution:
- Double-check that your images are saved in the right file format. If they aren’t, use an online converter tool to change them.
- For SVG files, make sure they aren’t too complex or large, as Cricut Design Space may struggle with intricate designs.
Issue 2. Overly Large Image Files: Uploading multiple images with large file sizes can slow down or even prevent them from uploading altogether. Large images take longer to process, and Design Space might throw an error if the files exceed size limits.
Solution:
- Resize your images before uploading to reduce the file size.
- Use a photo editing tool to compress your images without losing quality. This will make them easier to handle within Design Space.
Issue 3. Browser Compatibility Issues: Sometimes, the browser you’re using can affect how Cricut Design Space works. Some users experience lag or failures when trying to upload multiple images, especially if their browser is outdated or incompatible.
Solution:
- Try switching to a different browser to see if that resolves the issue.
Issue 4. Slow Internet Connection: If the connection drops, your uploads might not complete.
Solution:
- If possible, use a wired connection for more reliability, as wireless connections can sometimes be unstable.
Conclusion
Whether you’re creating intricate designs or preparing several elements for a big project, mastering this process ensures you maintain efficiency and focus on the creative aspects.
By following the steps outlined in this guide, from uploading files to organizing and managing them effectively, you can streamline your workflow and eliminate unnecessary frustration. Remember, knowing how to troubleshoot common issues like incompatible file types or slow uploads is key to a smooth Cricut experience. Keeping your files organized into folders, naming them clearly, and deleting unused images regularly can also prevent clutter and improve your project management.
Ultimately, learning how to upload and manage images with Cricut Design Space can save you time and effort, letting you focus more on bringing your creative ideas to life. With the right approach, you’ll find that using Cricut Design Space for complex projects becomes a seamless part of your crafting routine, allowing you to explore endless possibilities and create with confidence.
Learn more about smart cutting machines. Download our free guide to smart cutting machines here.
