How to Upload Fonts to Cricut Design Space

For Cricut enthusiasts, having unique fonts can transform designs from average to exceptional. But getting new fonts into Cricut Design Space might seem tricky if you’re new to the platform or unfamiliar with font uploads.

Imagine creating custom cards, labels, and crafts with fonts that reflect your style—whimsical, elegant, or bold. Adding custom fonts opens up countless possibilities to bring your creative ideas to life and make each project distinctly yours. No more limitations, just creative freedom!

This guide will take you through each step of uploading fonts to Cricut Design Space, demonstrating the process’s simplicity. Once you know how to do it, you’ll unlock a world of font options, giving your projects that personal touch and setting them apart from the crowd.

Ready to get started? Follow along, and by the end, you’ll be equipped to upload and use your favorite fonts in Cricut Design Space, opening up endless creative opportunities. Let’s dive in!

Unlocking Creative Freedom with Custom Fonts in Cricut Design Space

In Cricut Design Space, access to custom fonts is more than just a nice feature—it’s a transformative tool for anyone aiming to give their projects a distinctive touch. While Design Space offers a variety of default fonts, uploading your own can elevate your designs and truly capture your style. For hobbyists, DIYers, and professional crafters alike, custom fonts open the door to a boundless realm of creative expression that turns simple projects into stand-out creations.

Why Go Beyond Default Fonts?

Default fonts, while convenient, can be limiting when it comes to expressing individuality. Using customized fonts can make your designs genuinely yours, as each font has its own mood and style. Whether you’re creating intricate wedding invitations, branded merchandise, or playful home decor, your typography can evoke emotions, convey themes, and even tell a story.

Here’s why uploading fonts to Cricut Design Space is a must-have skill for any serious crafter:

  • Expand Your Design Toolkit: With custom fonts, you’re not confined to Cricut’s standard library. Instead, you can explore unique typefaces that align with your vision, adding versatility to your projects.
  • Craft Signature Projects: Personalized fonts allow you to add a signature touch to any creation, setting your work apart from mass-produced items and giving it a genuinely handcrafted feel.
  • Save Time and Effort: Once you’ve uploaded your fonts, you can seamlessly access them for multiple projects without repeatedly re-uploading.

Embracing Font Freedom: The Significance of Custom Font Uploads in Cricut Design Space

In the world of digital crafting, the ability to customize fonts is like having a secret weapon in your design arsenal. Cricut Design Space, a powerhouse for creative projects, allows endless possibilities when you can upload and use fonts beyond the pre-set options.

Why Uploading Fonts Enhances Your Cricut Experience

At first glance, the default fonts in Cricut Design Space may seem plentiful, but once you start exploring the vast universe of online typefaces, the potential for customization becomes irresistible. Fonts are more than letters—they reflect style, tone, and creativity. Here’s why mastering font uploads should be on every Cricut user’s list:

  • Endless Personalization: Custom fonts let you add a one-of-a-kind touch to every creation, whether you’re crafting wedding invitations, custom t-shirts, or home décor. Access to unique fonts allows your projects to resonate with a distinct personality and feel wholly tailored.
  • Elevate Professional Projects: If you’re creating items to sell or working on branded projects, specific fonts can help establish a professional look that aligns with your brand identity. Unique typefaces can add a layer of sophistication and ensure consistency in your creations.
  • Time-Saving Advantage: Once uploaded, custom fonts are ready to use anytime, making them easy to access across projects. This convenience means you can effortlessly design multiple pieces in the same style without starting from scratch every time.
  • Creative Control: You’re in the driver’s seat with access to your preferred fonts. You have complete control over every detail, from bold and playful to sleek and minimalistic, letting you design precisely how you envision.

Step-by-Step Guide: Uploading Fonts to Cricut Design Space

Ready to unleash the full potential of your design toolkit? Uploading fonts to Cricut Design Space is simpler than you might think, and this guide will walk you through the process, one step at a time. Whether you’re aiming to add a whimsical, elegant, or bold touch to your projects, following these steps will give you access to a whole new world of typography.

Steps to Upload Custom Fonts

Let’s break down the font-uploading process into straightforward steps to make sure you’re well-equipped to add any font you’d like to Cricut Design Space:

  • Download Your Desired Font
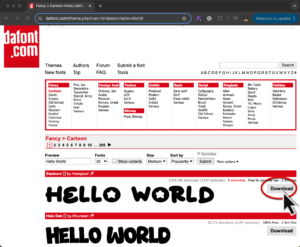
    • Choose a Reliable Source: Head to a trusted website, such as DaFont, Google Fonts, or FontSquirrel, where you can safely download free or paid fonts.
    • Download the Font File: Click the download button and save the file (usually in .ttf or .otf format) to your computer.
  • Install the Font on Your Computer
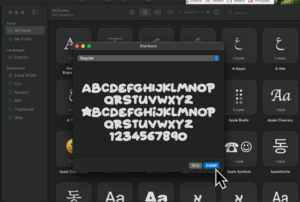
    • Locate the Font File: Go to the folder where you saved the downloaded font file.
    • Open and Install: Double-click the font file, and an installation window will appear.
  • Restart Cricut Design Space
    • Ensure Font Recognition: To ensure Cricut Design Space recognizes your new font, close and reopen the application. This refresh ensures that the font appears in the text options.
  • Access Your Font in Design Space
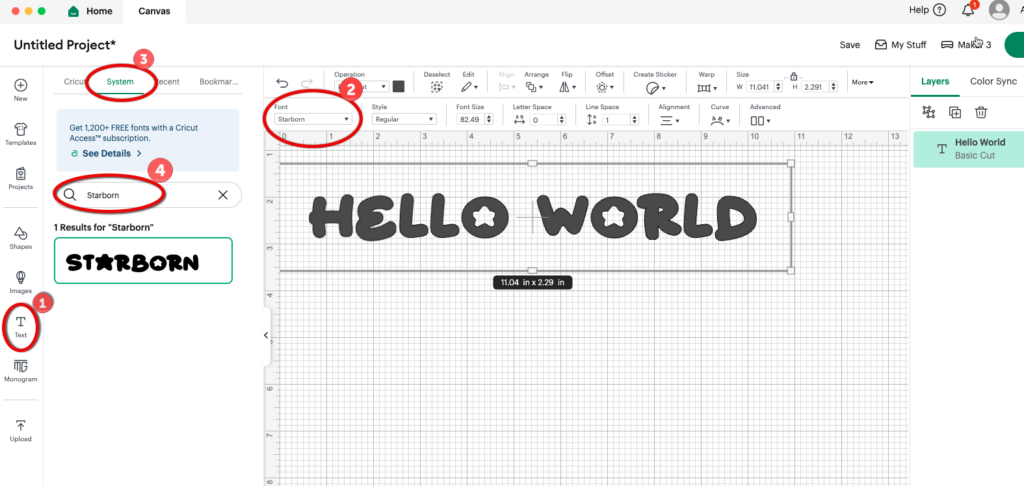
    • Select Text Tool: In Cricut Design Space, select the Text tool and open the Font dropdown menu.
    • Locate Your Custom Font: Use the search bar to find the font by name, and click on it to start designing with your newly added font!

Quick Troubleshooting Tips

Issue Solution
Font Not Appearing Ensure you close and reopen Cricut Design Space after installing the font.
Font Installed, Not Showing Double-check the font file format (.ttf or .otf), as these are compatible with Cricut.
Font Display Issues Try re-installing the font or verify that it’s not corrupted (download from another source).

Expert Tips for Maximizing Your Custom Fonts in Cricut Design Space

Now that you know how to upload fonts to Cricut Design Space, let’s review some expert tips to make the most of your custom fonts. Using custom fonts opens up endless possibilities for personalizing your projects, but there are a few ways to make them even more effective and polished. Here’s a step-by-step process for enhancing font use so each design looks professional and unique.

Steps to Optimize and Perfect Your Custom Fonts

  • Choose Fonts Wisely for Readability and Style
    • Match the Font to Your Project: Some fonts are perfect for decorative purposes, while others are better for readability. Calligraphy fonts work well on invitations, while bold, sans-serif fonts are ideal for labels.
    • Limit Font Variety: To keep your design cohesive, stick to no more than two or three fonts. Too many fonts can make your project look chaotic and less professional.
  • Adjust Font Spacing for a Balanced Look
    • Use Letter Spacing: In Cricut Design Space, you can adjust letter spacing to ensure the text looks balanced and fits perfectly. This is particularly useful for script fonts, which often have letters that need to be closer together.
    • Kern Individual Letters if Necessary: If the spacing doesn’t look quite right, you can ungroup the letters and manually adjust each to ensure optimal alignment.
  • Test Your Design by Cutting a Sample
    • Preview with a Sample Cut: Before committing to your final material, try cutting a sample on inexpensive materials like cardstock. This step helps you check your chosen font’s readability, size, and spacing.
    • Adjust and Resize as Needed: Sometimes, fonts look different on the screen than when cut. A test run helps determine if resizing or font style adjustments are needed.
  • Use Contour and Weld Tools for a Seamless Design
    • Contour Out Unwanted Parts: If a font has decorative elements you don’t need, use the Contour tool to remove them for a cleaner look.
    • Weld Script Fonts Together: When using script fonts, weld the letters together to avoid cuts between each letter. Welding merges all letters into a smooth cut path, ideal for a polished finish.
  • Play with Effects Like Shadows and Outlines
    • Duplicate for Shadow Effects: Create a shadow effect by duplicating your text, changing its color, and positioning it slightly offset from the main text.
    • Outline Fonts with Offset Tool: Cricut’s Offset tool lets you add outlines to text, making fonts more prominent, especially on busy backgrounds.
  • Organize Your Fonts for Quick Access
    • Save Frequently Used Fonts: Organize your frequently used custom fonts in a dedicated folder or label them in Cricut Design Space. This will save time and allow you to access your favorite fonts for future projects quickly.

FAQs: Custom Fonts in Cricut Design Space

Can I use any font in Cricut Design Space?
Yes, you can use almost any font compatible with your computer in Cricut Design Space. The software supports popular font formats like TrueType (.ttf) and OpenType (.otf).

Why isn’t my custom font showing up in Design Space?
If your font isn’t appearing, try closing and reopening Cricut Design Space. The software may need a refresh to detect new fonts. Double-check that your font file is in .ttf or .otf format, as other formats may not be recognized.

Do I need to buy fonts to use in Cricut Design Space?
Not necessarily. Many free fonts are available on DaFont, Google Fonts, and FontSquirrel. However, premium fonts can offer unique styles and higher quality, so a purchase might be worthwhile if you find a font that perfectly fits your project.

Can I use fonts for commercial Cricut projects?
This depends on the font’s licensing agreement. Many free fonts are for personal use only, while others allow for commercial usage. Always review the licensing terms before using a font for items you plan to sell.

How do I remove a font from Cricut Design Space?
To remove a font, uninstall it from your computer. Once removed, it will no longer appear in your Cricut Design Space font list.

Reflecting on Your Font Mastery: What Have You Gained So Far?

So, let’s pause for a moment—how are you feeling about custom fonts in Cricut Design Space? Do you feel ready to explore the world of typography, creating designs that truly stand out? As you think about everything covered, ask yourself, “Am I ready to dive in and experiment, or do I need more practice?”

Picture this: your next project featuring that perfect, custom font that matches your style and captures the exact mood you’re going for. Isn’t it exciting to think how much more polished and professional your designs can look with just a few tweaks and tips?

A thought to inspire you: “Creativity is intelligence having fun.” Remember, every new font is another chance to let your creativity shine, so embrace the freedom custom fonts offer. And if you’re still curious or have questions, keep experimenting! The journey of mastering fonts in Cricut Design Space is just beginning.

Are You Ready to Elevate Your Cricut Projects?

As you reflect on all we’ve covered about uploading and using custom fonts, consider how this new knowledge could transform your Cricut projects. Have you started envisioning unique designs with fonts that truly express your style? “The only limit is your imagination,” and that statement couldn’t be more accurate with custom fonts.

Ask yourself: Am I ready to take my designs to the next level? Imagine seeing your chosen fonts’ polished, personal touch in each project. Custom fonts let you create something that’s not only beautiful but uniquely yours. This guide has laid out each step, from installation to troubleshooting, so you have a roadmap to explore your creativity without limits.

Remember, this isn’t just about fonts; it’s about making your designs reflect your style. What’s the first font you’ll try, and how will you make it your own?

Leave a Reply

Your email address will not be published. Required fields are marked *